Jupyter Notebooks#
The Jupyter Notebook is a standard format [], with the file extension .ipynb, that is interpreted by a range of applications.
The applications that interpret the .ipynb format create documents that can run Python code interactively, and place the code alongside narrative text and equations.
This book is, in fact, a series of Jupyter Notebook documents, that have been rendered to HTML.
This means that it is possible to show the result of the execution of some Python code.
print("Hello World!")
Hello World!
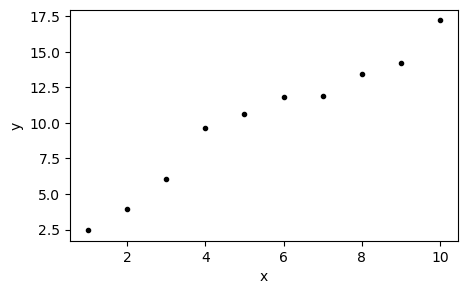
The ability to execute Python code means that these documents can also include useful information, like plots of data that we have collected.
import numpy as np
import matplotlib.pyplot as plt

x = np.arange(1, 11, 1)
y = 1.4 * x + 2.3 + np.random.randn(10)
fig, ax = plt.subplots(figsize=(5, 3))
ax.plot(x, y, 'k.')
ax.set_xlabel('x')
ax.set_ylabel('y')
plt.show()
Applications#
There are a couple of applications that enable interactive Jupyter Notebooks. By far, the most popular is JupyterLab, which is the standard application for working with Jupyter Notebooks and includes a simple text editor. However, another popular tool is VSCode, this is a text editor [], and therefore it will be mentioned again later, that is capable of running interactive Jupyter Notebooks.
Both JupyterLab and VSCode are great tools for working with Notebooks; some people enjoy working entirely in one environment (be that JupyterLab or VSCode), while others prefer to run their Notebooks in JupyterLab and using VSCode, or another text editor, to edit modules and scripts. It is a point of preference, it is best to try both options and find out which suits best.
Anaconda#
The easiest way to get JupyterLab and a Python installation running locally is by installing Anaconda. Anaconda includes a Python distribution with a large number of useful libraries as standard, in addition to tools such as JupyterLab (and VSCode). Downloading and installing the Anaconda distribution will install the “Anaconda Navigator” application on your computer. When this application is opened, it is possible to launch JupyterLab from the Home screen, which should open the JupyterLab interface in the default web browser.
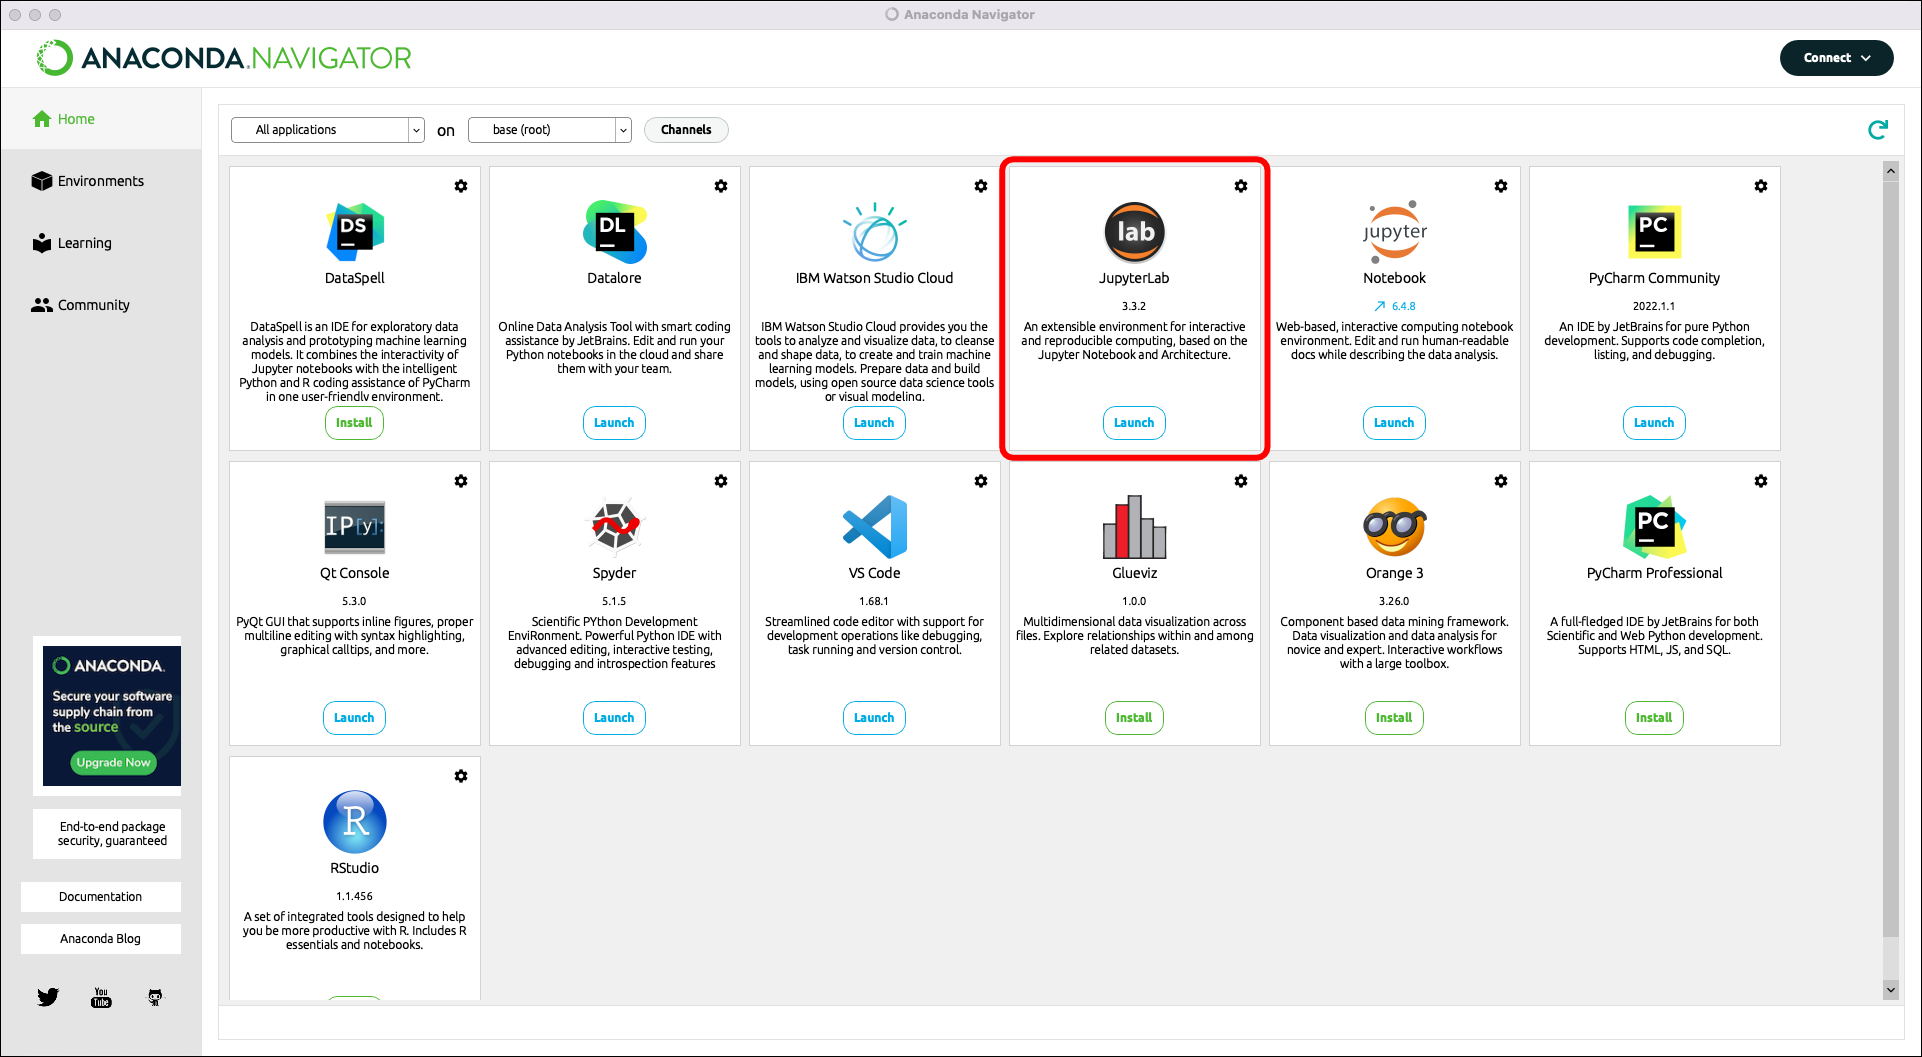
The Anaconda Navigator application launch screen; JupyterLab is indicated (red rectangle).#
Mamba#
Anaconda is not the only way to get JupyterLab running locally, for example, Mamba can be used to install JupyterLab, however, this requires some familiarity with the command line to install. Once Mamba is installed JupyterLab can be installed using the command,
mamba install -c conda-forge jupyterlab
with JupyterLab installed, it can be launched with the following command,
jupyter-lab
This will launch directly to JupyterLab in a web browser, i.e., there is no Anaconda Navigator application.
Task
Over the next few weeks, try to install Anaconda on your on machine.
Using JupyterLab#
The JupyterLab Interface#
Once the Noteable service has launched, it will open the interface shown in jupyterlab.
From this interface, the file system can be navigated, new Notebooks can be created, a large range of files can be opened, and a command line can be accessed.
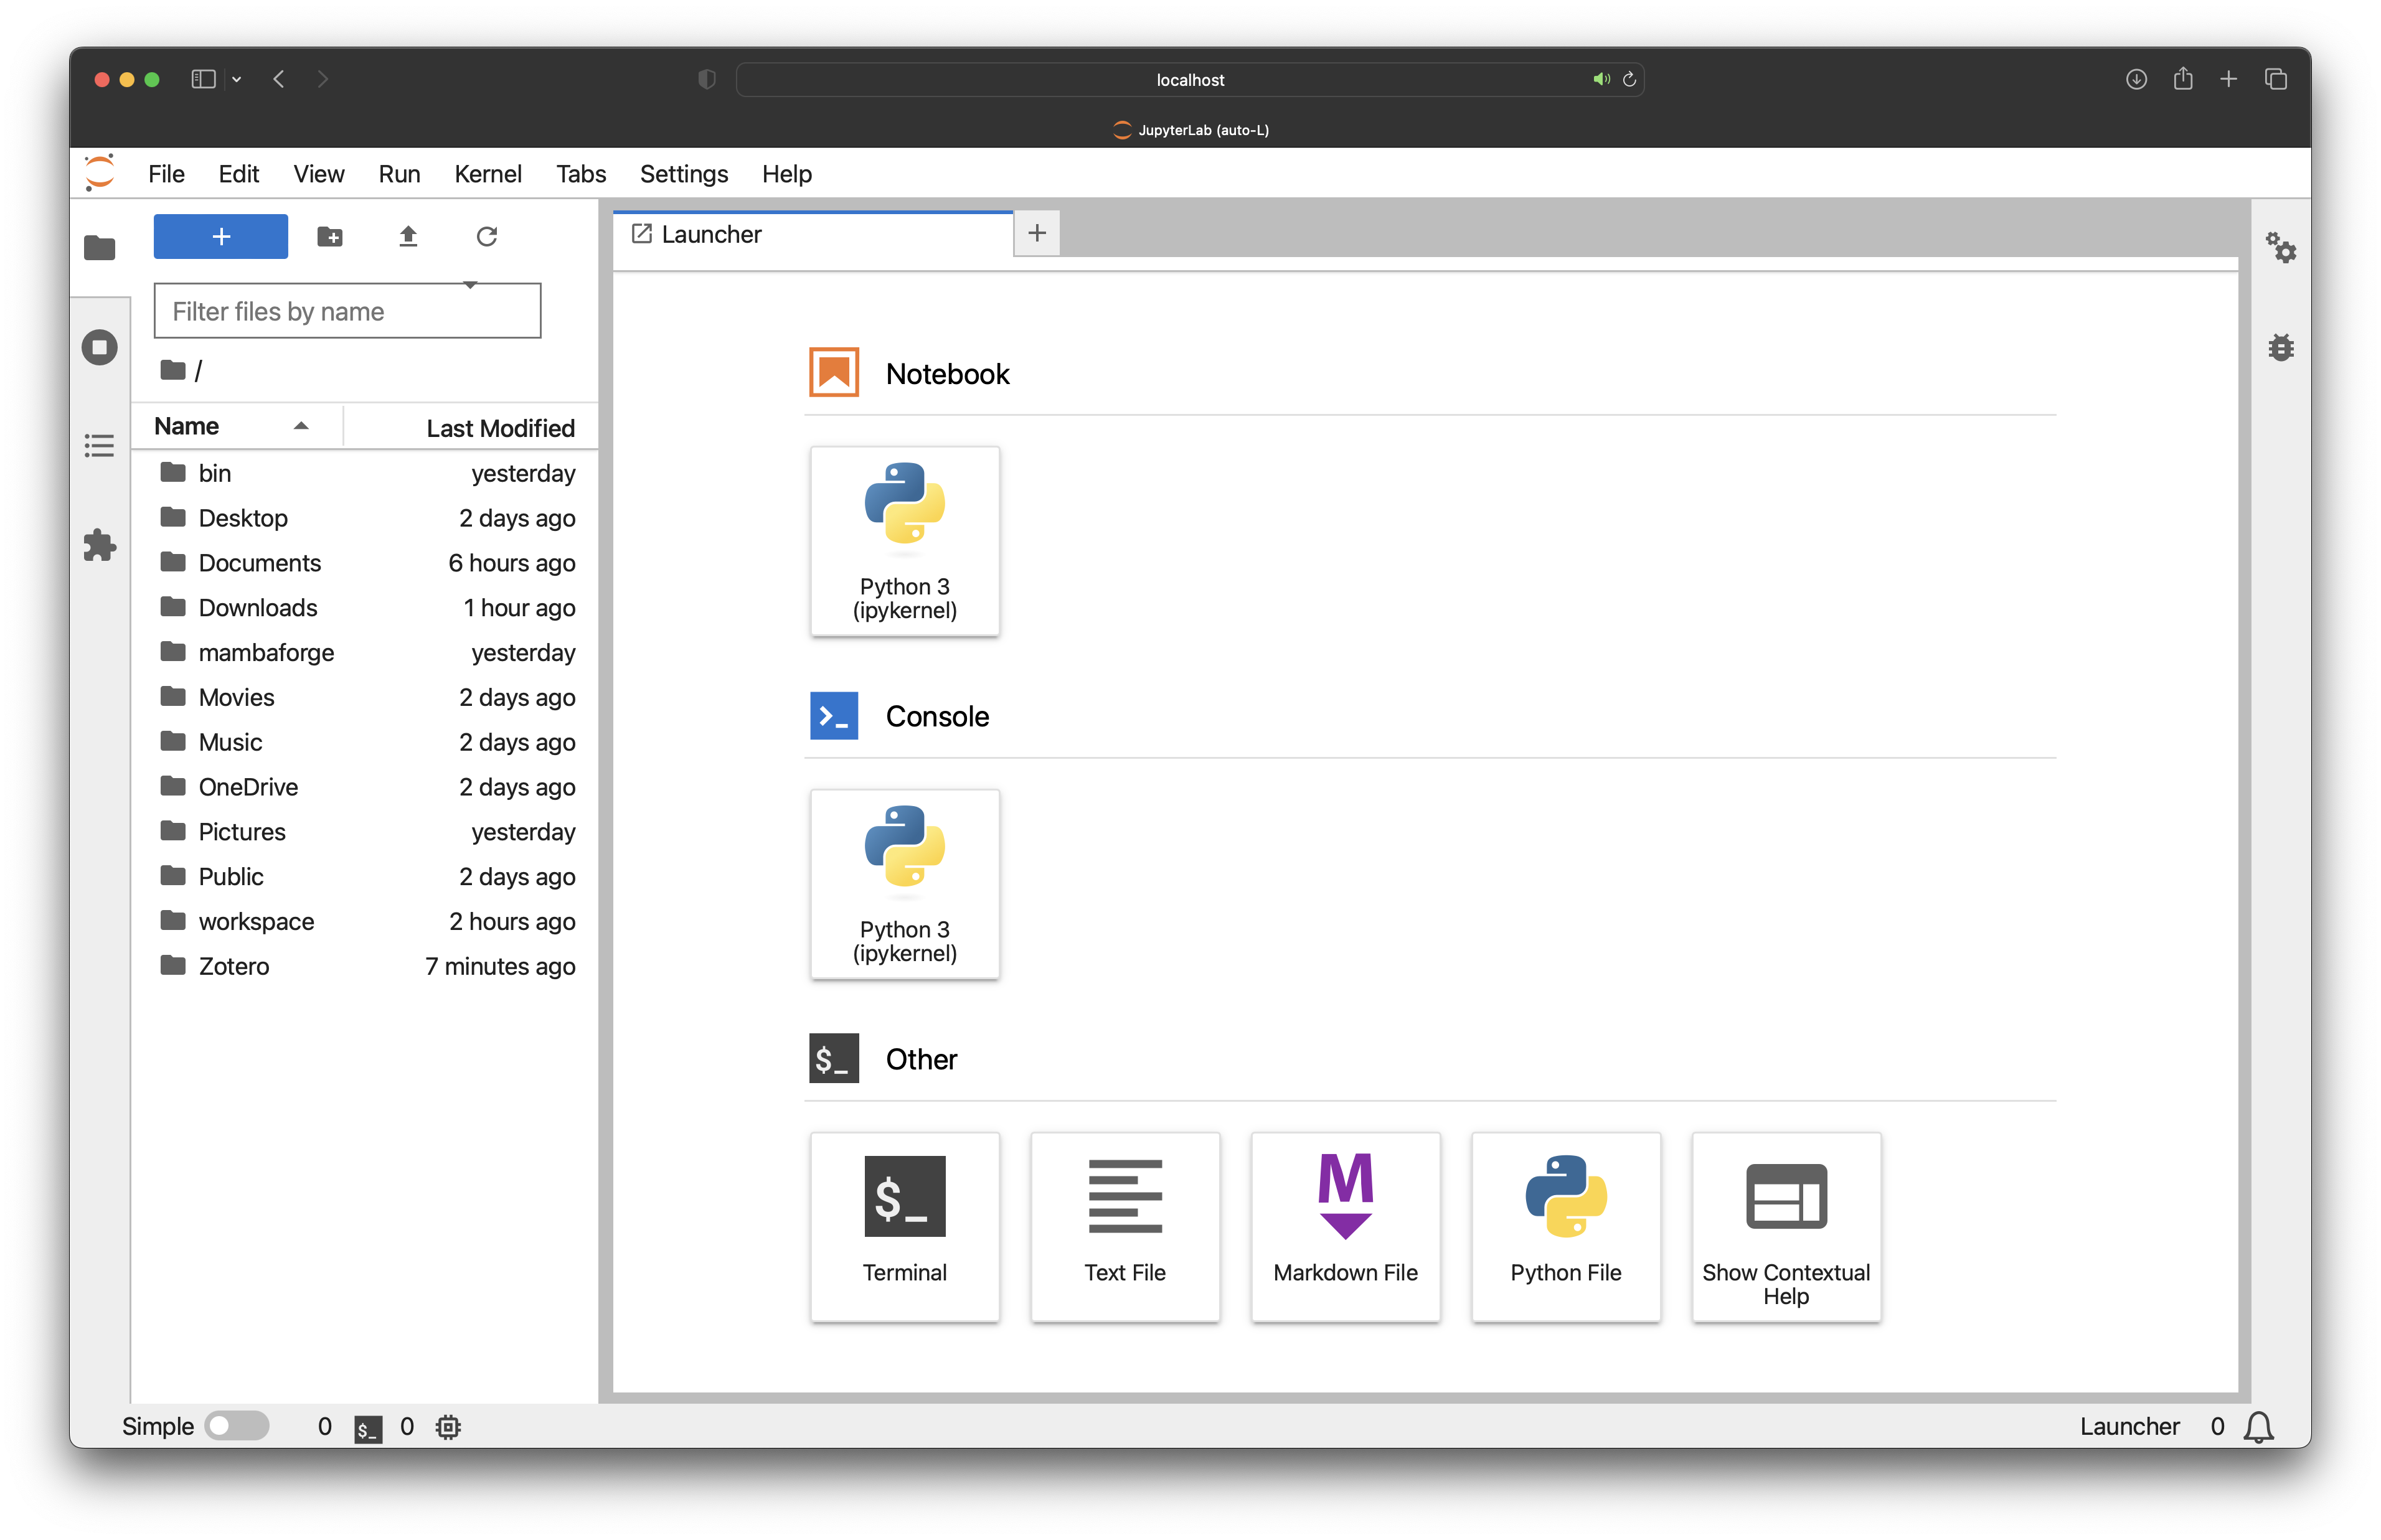
The main JupyterLab interface (zoomed in to make it more readable).#
Task
Read the introduction to the JupyterLab interface on the JupyterLab project’s online documentation page: jupyterlab.readthedocs.io/en/stable/user/interface.html.
Creating a New Jupyter Notebook#
From the JupyterLab Launcher, to create a new Notebook, click on the Python 3 (ipykernel) button listed under Notebook as shown in new-notebook.
This will open a new Notebook called Untitled.ipynb in whichever folder is open in the left sidebar.
When a Notebook is open in the main work area, the Launcher can be brought back by clicking the “+” button at the top of the left sidebar.
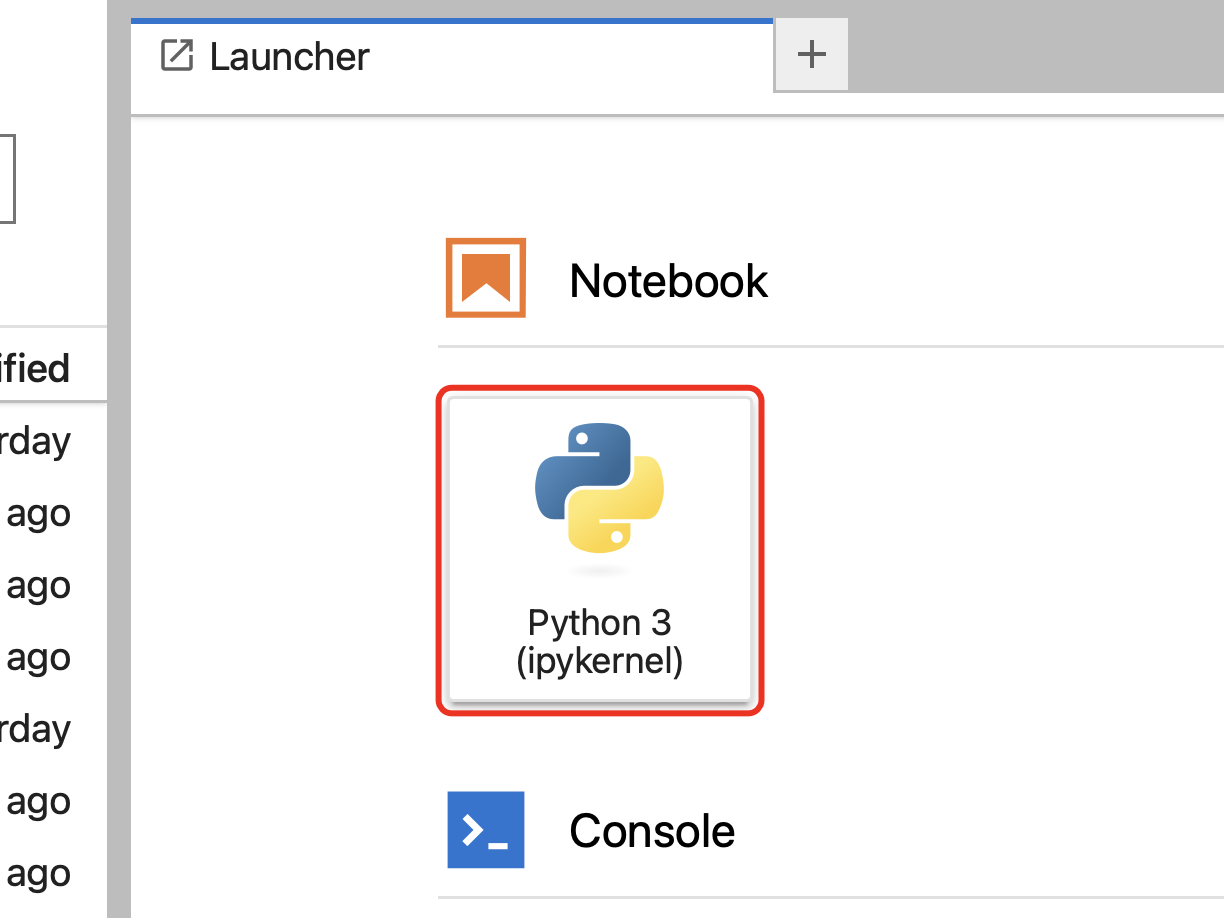
The button to open a new Notebook (red rectangle).#
Renaming a Notebook#
When a new Notebook is created, the file can be found in the left sidebar, called Untitled.ipynb and the Notebook will open in the main work area.
If there is already a file named Untitled.ipynb in the director, the new Notebook will be given the name Untitled1.ipynb, if this Notebook already exists, the file will be called Untitled2.ipynb, and this process will continue.
Having a large number of files called UntitledX.ipynb is not very informative, and can be problematic in the future if you are returning to some prior work and cannot remember which Notebook has the interesting analysis because they all have, essentially, the same title.
Notebooks can be renamed to give them more informative titles.
This is achieved by right-clicking on the file in the left sidebar file browser, which opens a dialogue window (rename).
From this dialogue, selecting Rename will make the file name editable.
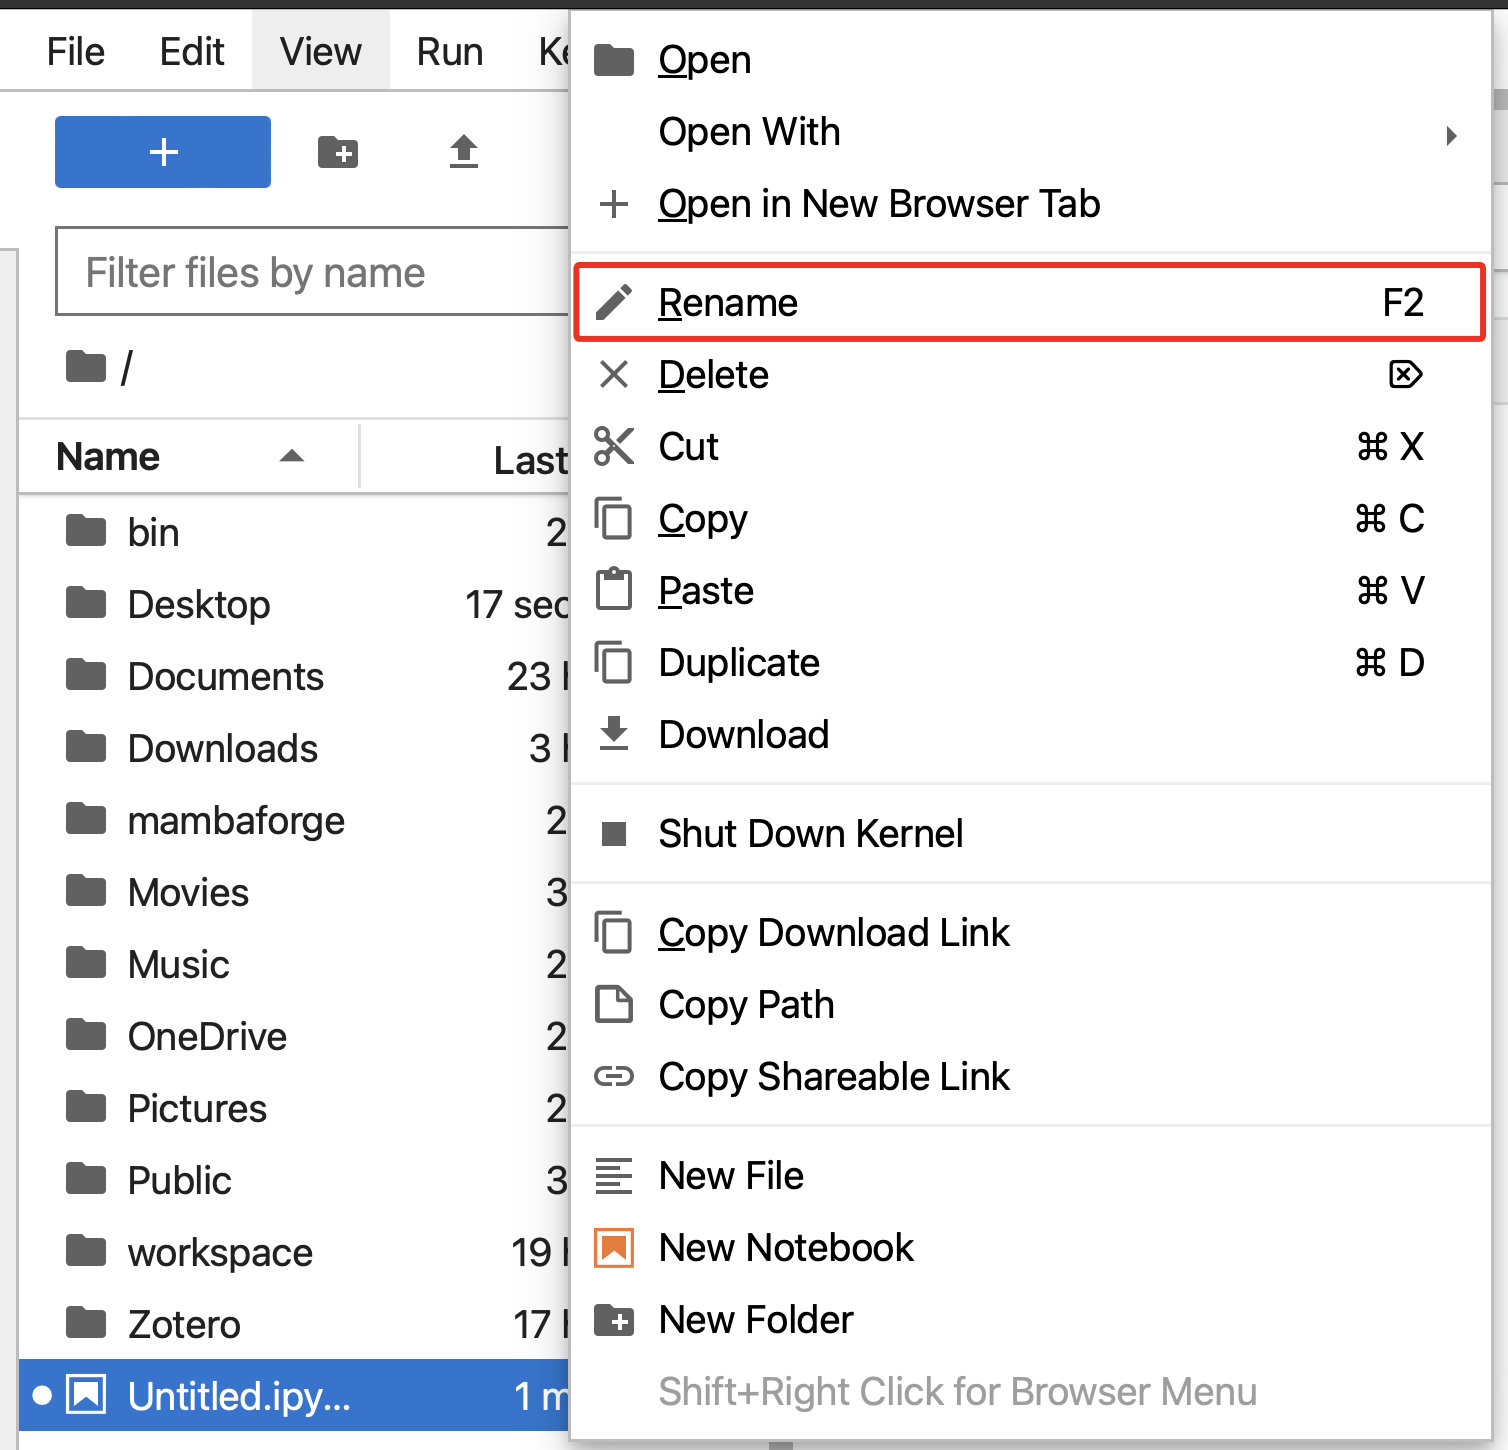
The right-click dialogue for a Jupyter Notebook in the JupyterLab interface; `Rename`` indicated (red rectangle).#
Task
Create three Jupyter Notebooks and rename them as follows:
Untitled.ipynb→foo.ipynbUntitled1.ipynb→bar.ipynbUntitled2.ipynb→baz.ipynb
Using Jupyter Notebooks#
Interface Elements#
There are a few parts of the Notebook interface that to draw attention to (interface):
The Notebook/file tabs. Similar to modern web browsers, JupyterLab allows many files to be open simultaneously within a tabbed interface.
The toolbar contains buttons for common actions relating to working with Notebooks, hovering over the button with the cursor will pop up relevant information.
The cell, which depending on the type, Python code or Markdown can be written in this box.
Indictates if a cell has been run or not, when the cell has not been run it will read
In [ ]:and run cells will haveIn [x]:, wherexis a number that indicates the order that the cells were run.

Some important interface elements in the Jupyter Notebook.#
Cells#
Cells make up the body of a Notebook. When a new Notebook is opened, it will contain a single empty cell. Other cells can be added below the currently selected one by running the cell, pressing the “+” button in the toolbar or by using the keyboard shortcut of pressing “B” (the shortcut “A” can be used to add a cell above the currently selected one). Cells can be of different types, there are two particularly important ones to be aware of.
Code Cells#
A code cell contains Python code that can be executed. When the cell is run, the notebook will display any output from the final line of the cell in the corresponding cell.
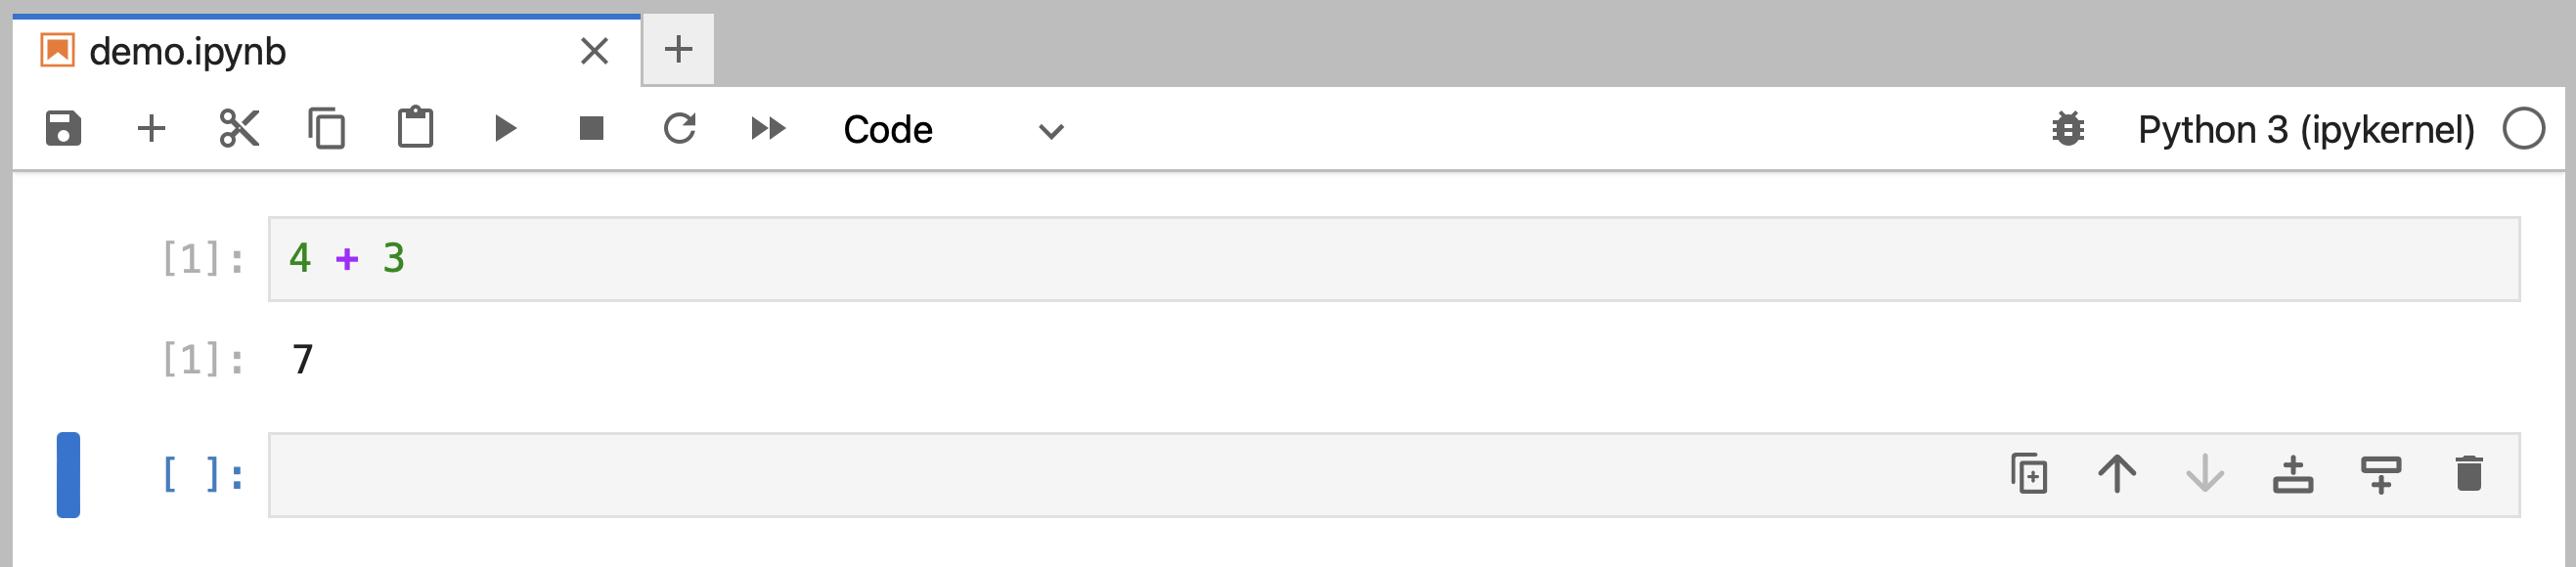
An example of a code cell that has been run, the Python code in the cell performs the addition of 4 and 3 to give 7 as a return.#
A cell is run by either clicking on the ► icon in the toolbar or using “Control + Enter” (Windows) or “Command + Enter” (macOS) on the keyboard.
Task
Nearly every introduction to programming resources starts with a “Hello, World!” exercise, where you make the computer print the phrase “Hello, World!”, and this course is no different.
Create a new Notebook, rename the file to Hello-World.ipynb and into the first code cell type the following:
print("Hello, World!")
When the cell is run, the phrase should be printed below the code cell.
Markdown Cells#
The type of cell can be changed using the drop-down menu in the toolbar.
After “Code”, the most important type of cell is “Markdown”.
A markdown cell contains text that is formatted using Markdown, which is a lightweight markup language for writing HTML documents.
When a markdown cell is “run”, the markdown is formatted to HTML, and the formatted text is shown in place of the cell (markdown-rendered).

A markdown cell that has not been run yet, showing the raw markdown.#

The rendered markdown, with the nicely formatted equations.#
Task
Write a Markdown cell that describes what you ate for breakfast this morning.
Active Cells#
The currently active cell is indicated by being highlighted.
The presence of the cursor, the blinking | symbol, indicates that the cell is currently in either the command or edit mode.
Command Mode#
When in command mode, the cell content cannot be edited but keyboard shortcuts can be used to cut, paste, and move whole cells. All of the keyboard shortcuts can be found online.

A Notebook cell in command mode.#
Edit Mode#
From command mode, pressing Enter or clicking in the input text area of a cell will switch the cell to edit mode. When in edit mode, code or markdown can be written.

A Notebook cell in edit mode.#